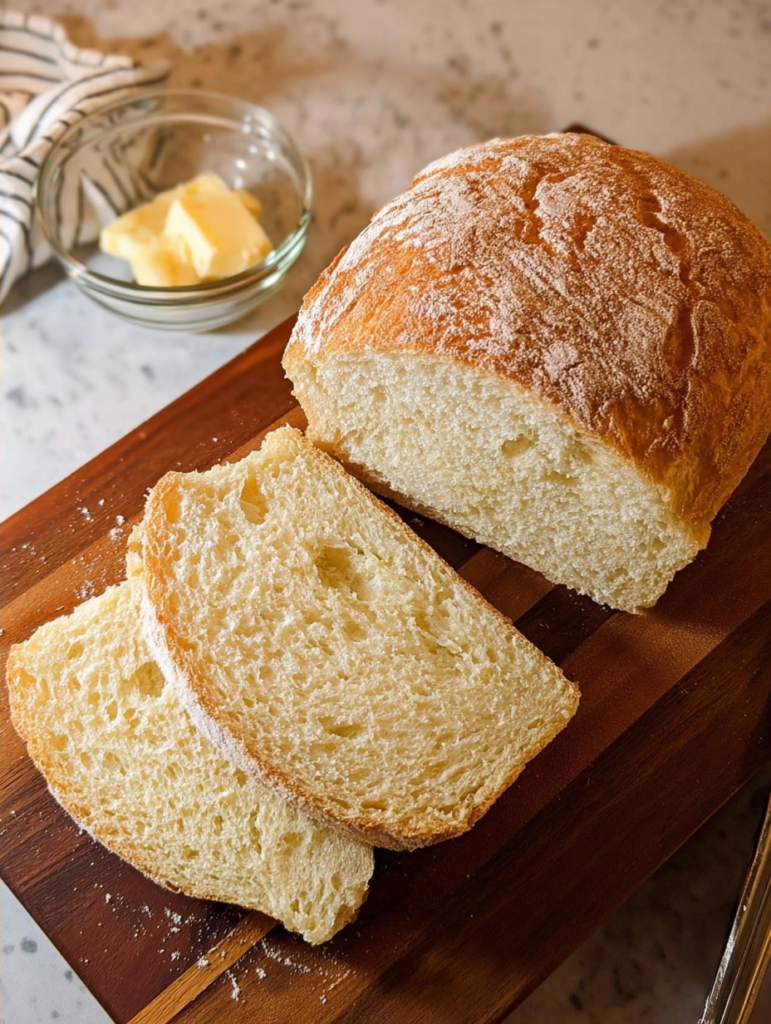
While living in a small apartment, I turned to my bread machine to create bakery-style loaves from just a few ingredients. The result? A warm, golden, soft loaf bursting with homebake charm on my kitchen counter within hours. If you, too, crave the comfort and simplicity of homemade bread but lack the time or expertise of traditional methods, you’ll love this bread machine bread recipe. Quick, easy, and family-friendly—this is a versatile bread that adapts perfectly to your schedule and tastes.
Eminent Recipes is your destination for delicious, hassle-free cooking and baking, and this bread machine bread recipe fits that mission perfectly. Whether you’re making a balanced one-pot meal or simply need a fresh loaf for a special meal, this bread is your go-to solution every time.
| Prep Time | 10 mins |
|---|---|
| Cook Time | 3 hours |
| Total Time | 3 hours 10 mins |
| Servings | 8 slices |
| Difficulty | Easy |
| Cuisine | American |
Why This Recipe Works
This recipe for bread machine bread works every time, thanks to its simple yet effective ingredient ratios and precise instructions. I remember the first time I made a loaf successfully—it filled my home with a warm, comforting aroma that instantly brought smiles. No more store-bought bread filled with preservatives or dry, tasteless slices here; this loaf is soft, moist, and just right.
The combination of a bread machine and this recipe ensures consistent results every time. With the machine doing all the hard work, even novice bakers can pull off impressive results. Just add the ingredients in the right order and select the correct settings, then sit back and wait for your loaf to be ready. Whether you want to customize the flavors or stick to the classics, this bread gives you the versatility you need.
Ingredients
| Ingredient | Quantity | Notes |
|---|---|---|
| Warm water | 1 ¾ cup (110°F / 45°C) | Mesured carefully to avoid killing the yeast |
| Neutral cooking oil | 2 tablespoons | Can use vegetable, canola, or sunflower oil |
| Granulated sugar | 1 ½ teaspoons | Promotes browning and aids yeast activity |
| Coarse kosher salt | 1 teaspoon | Enhances flavor and controls yeast growth |
| Bread flour | 4 cups | For better rise and chew; all-purpose is acceptable in a pinch |
| Rapid rise or bread machine yeast | 2 teaspoons | Ensure it’s active and not expired |
Step-by-Step Instructions
Prepare the Ingredients
- Measure and prepare all of the ingredients before starting the bread machine. This includes warming the water and measuring the flour and yeast precisely.
- Ensure your bread machine is clean, and the baking pan is positioned correctly inside the machine, without any obstructions.
Add Liquids and Dry Ingredients
- In the baking pan of your bread machine, combine the 1 ¾ cup warm water, 2 tablespoons of vegetable oil, 1 ½ teaspoons of granulated sugar, and 1 teaspoon of coarse salt.
- Next, add the dry ingredients. Carefully pour 4 cups of bread flour into the pan, ensuring it forms a mound. Then, sprinkle the 2 teaspoons of bread machine yeast on top or make a small well in the flour and drop the yeast in there, to prevent direct contact with the water.
Bake the Bread
- Place the baking pan in the bread machine. Select “Basic,” “Light Crust,” and “2 lb Loaf” options if available. If not, choose “Basic” or “White” cycle.
- Wait for the bread machine to complete its cycle. The machine will handle the kneading, rising, and baking processes automatically.
Cool the Bread
- Once the machine beeps to indicate the cycle is done, immediately remove the baking pan and turn the loaf onto a wire rack. Delay risks the bread machine activating the “keep warm” mode, which can dry it out.
- Allow the bread to cool completely before slicing to avoid a gummy texture. This process typically takes about an hour to an hour and a half.
Chef Tips for Perfect Results
- Measure flour carefully. A kitchen scale provides the most accurate reading, but a properly fluffed cup measure works too. Over-flouring can lead to dry, dense bread.
- Use water that’s precisely 110°F (45°C). Too hot, and you kill the yeast. Too cold, and the yeast won’t activate properly.
- Sprinkle the yeast on top of the flour or in a small well to avoid direct contact with the water. Yeast needs moisture to activate, but direct immersion can kill it immediately.
- Allow the bread to cool completely before slicing to preserve its texture. Slicing too early can compress and ruin the loaf’s structure.
Common Mistakes to Avoid
- Mistake: Forgetting to use the correct type of flour (e.g., all-purpose instead of bread flour). This can lead to a less rise and a denser loaf. Fix: Always use bread flour for best results, or add vital wheat gluten to all-purpose flour as a substitute.
- Mistake: Using lukewarm or cold water instead of exactly 110°F. The perfect temperature is necessary for the yeast to activate. Fix: Use a thermometer and adjust water accordingly.
- Mistake: Not removing the loaf from the machine after the cycle ends. The “keep warm” mode dries out the bread. Fix: Always remove the pan immediately after the beep sounds.
- Mistake: Cutting the bread too early. Fresh bread is warm and will gush if cut too soon. Fix: Let the bread cool completely on a wire rack.
Variations and Substitutions
| Ingredient | Substitution | Impact on Flavor |
|---|---|---|
| Bread flour | All-purpose flour + 1 tsp vital wheat gluten | Maintains structure, slightly denser but still workable loaf |
| Neutral oil | Butter (melted and slightly cooled) | Richer flavor, more tender crumb |
| Sugar | Honey or maple syrup (¼ cup liquid measure equivalent) | Adds distinct flavor, more browning |
| Yeast | Active dry yeast (use 2½ tsp instead of 2) | Needs to be activated separately before adding to machine |
| Salt | Sea salt or fine salt (adjust quantity slightly as needed) | Subtle flavor variation |
Serving Suggestions and Pairings
This bread machine bread is incredibly versatile and can be served in so many ways. For breakfast, toast it and spread with homemade jam, avocado, or a bit of peanut butter. For lunch, use it as a base for classic sandwiches or add soups and salads for a complete meal. At dinner, it’s perfect alongside stews, pasta dishes, or roasted vegetables. For a special occasion, brush the slices with butter and garlic before toasting for a restaurant-style finish.
Storage and Reheating
| Method | Duration | Instructions |
|---|---|---|
| Room Temperature | 1-2 days | Store in an airtight container. Bread may become stale after a day or two. |
| Freezer | Up to 3 months | Wrap the cooled loaf tightly in plastic wrap, then aluminum foil. Thaw at room temperature before reheating. |
| Reheating | As needed | Wrap in foil and heat in a 350°F oven for 10-15 minutes. Or, toast individual slices in toaster until desired crispness. |
Nutritional Information
| Nutrient | Amount per Serving |
|---|---|
| Calories | Approximate values. |
| Protein | 4 g |
| Fat | 3 g |
| Carbohydrates | 24 g |
| Fiber | 2 g |
| Sugar | 1 g |
| Sodium | 320 mg |
Frequently Asked Questions
Can I substitute a different type of flour?
Yes, but all-purpose flour won’t give the same rise and texture. For best results, use bread flour or enhance all-purpose flour with vital wheat gluten.
How do I tell if the bread is done baking?
Once the bread machine alerts you to the end of the cycle, the bread should sound hollow when tapped. For further confirmation, a digital thermometer should read at least 190°F in the center.
My bread came out gummy — what went wrong?
This could mean the bread was undercooked or sliced too soon. Let it cool completely—around one hour—and try baking again if underbaked, using a higher temperature setting on the machine if available.
Can I prepare the bread the night before?
Absolutely! Many advanced bread machines have a delay timer. You can also prepare the dough and store it in the fridge for 24 hours before completing the bake, a technique called cold fermentation.
What is the best way to serve this bread?
Aim for a warm-to-room-temperature slice. For the crispiest crust, toast it in a pan with a little butter or brush with olive oil and garlic then broil briefly. It’s also excellent in soups or as part of a grilled cheese sandwich.
Conclusion
Baking bread machine bread is a rewarding, easy task that results in consistently delicious homemade loaves. With minimal effort and ingredients, you can create a warm, golden, soft bread that’s perfect for any part of your day. Try this simple, reliable recipe from Eminent Recipes, and discover why homemade bread has become a staple in my kitchen. The taste of fresh, comforting bread is hard to resist—and now, thanks to your bread machine, it’s just as easy to make at home.

Bread Machine Bread: A Home Bakery Classic
Ingredients
Method
- Add water to the bread machine first
- Add oil, sugar, salt, and yeast
- Pour in flour
- Select the basic white bread setting
- Start the machine and wait for the loaf to bake
Notes
Check water temperature to avoid killing yeast
Cool the loaf on a wire rack before slicing
Store in an airtight container to maintain freshness